Words of Wisdom

"When it comes to implementing a successful home storage program, the most important step is to start."
New Year, New Progress Ensign, January 2009

To read the entire article click here.

Tuesday, April 20, 2010

3 Month Supply: Putting Together Your Plan

If you want your 3 month food supply to be more than a random collection of cans, box foods and wheat, and instead be something you can use, you need to determine what a 3 month supply actually means to you.

Answering the following 5 questions will help you do this:

1. Why am I building a 3 month supply of food?
  • Natural disasters
  • Economic crisis
  • Health benefits
  • Everyday Emergencies
  • Religious Reasons
2. What kinds of foods do I want to include?
  • Shelf stable items only
  • Fridge and freezer items
  • Fresh produce
3. How will I plan what to buy for my supply?
  • Paper and pencil - click here for worksheet
  • Excel spreadsheet - click here for spreadsheet
4. How much money can I afford to budget?
  • All at once
  • A little at a time
5. How will I shop for my 3 month supply?
  • In bulk
  • Coupons
  • Weekly sales
Now that you have answered these questions you're ready to put your plan together.  Use the worksheet or spreadsheet to plan out 1 months worth of the following meals: breakfast, lunch, dinner & snacks. Remember, these should be meals that your family likes to eat so get them involved in choosing which ones make it to the plan.

Once you have your menu put together, collate all the ingredients from all the meals to come up with the total amount of each item you need for 1 month. For example, if I plan on using 1lb of ground beef in 4 of my recipes I will need 4 lbs of ground beef for 1 month. Now, simply multiply that number by 3 to get the total amount needed for your 3 month supply. Don't forget to take into account any of the ingredients you already have on hand.

For those of you comfortable with MS Excel I highly recommend using the spreadsheet created by the wonderful sisters at FoodStorageMadeEasy.net.  This spreadsheet does all the calculations for you and allows you to easily figure out how much of each item you need. 

Below is a basic tutorial on how to use the spreadsheet.


For those of you, like me, who have struggled with what a 3 month food supply really is, I hope that this sheds some light on the subject.  For me, the aha moment was when I realized that my 3 month supply can include refrigerated and frozen items and that I can use fresh produce, if I want to. 

The important thing is that your 3 month plan needs to work for you.

Good luck sisters.

Shelving Options

Before you can start building your food storage supply, you have to have somewhere to put it.  Below are a number of shelving options to fit every size of home and budget.

Build your Own:

Cardboard Rotating Rack - cheap, but time consuming.  Click here to download instructions.


Wooden Rotating Rack - you'll need a handy person around to figure this one out!


Decorative Rolling Rack - what a great idea for a small home or apartment.


Purchase Shelving:

Metal or plastic shelving - inexpensive and available at stores like Walmart and Target.  A really good starting point but don't allow for easy rotating.


CanOrganizer.com - good value, but made of cardboard so may not last too well.


www.canorganizer.com/

PharaohsStorehouse.com - mid priced shelving options with in-wall, on-wall, pull out and lazy susan designs

http://www.pharaohsstorehouse.com/


ShelfReliance.com - The Cadillac model of rotating shelves systems.  Very expensive but oh so cool!


http://www.shelfreliance.com/

Monday, April 19, 2010

Taste Tested - March

Breakfast - Blueberry Muffins with Streusel Topping

To download recipe card click here.

Taste: 2.0
Ease to Make: 1.0
Special Ingredients: Freeze Dried Blueberries
How Long to Make: 45 minutes + baking time

Reviews:
I'll not likely make these again. If I did, I'd only make half the streusel topping. It just poured off the muffins and made a mess under the cooking rack. They were labor intensive and not that great tasting. It was a sad day at our house. Boys say thumbs down.


Dinner - Whole Wheat Meat Loaf
 
To download recipe card click here.

Taste: 3.5
Ease to Make: 3.5
Special Ingredients: Cooked wheat, Worcestershire sauce
How Long to Make: 15 to prepare, half hour to pressure cook wheat, hour to cook

Reviews:
This fell flat for us. To be honest, I think it was more the meatloaf recipe that we didn't like then the wheat in it. I think adding some wheat to a good meatloaf recipe is a better way to go. Although this isn't going to be something we eat regularly we would eat it in an emergency. My husband recommends having lots of ketchup on hand though!!

I will most likely add wheat to my regular recipe in the future. My kids didn't love it, but ate it. Kel said this recipe was a 5 for meatloaf (not a fav of his), but a 3 overall for our usual menu. I didn't love the nutmeg...

It was good and I might possibly make it again. I had to substitute onion powder for the onion since my daughter cannot eat onion right now. I used three pieces of bread to tear into large bread crumbs because it wouldn't hold the loaf shape. I didn't follow the recipe exactly because I was making it for three families and instead of 1 1/2 lbs of beef I had 2 1/2 lbs so I tried to adjust the ingredients accordingly.

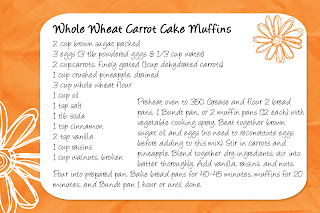
Desert - Whole Wheat Carrot Cake Muffins

To download recipe card click here.

Taste: 4.0
Ease to Make: 4.0
Special Ingredients: Canned pineapple
How Long to Make: 30 minutes + baking

Reviews:
This is a big (Mormon sized) batch. (24 muffins) I used two square baking pans. I substituted pecans for walnuts and topped one with pecans and one with brown sugar. Nobody could seem to decide which they liked best! I also added ½ t. nutmeg, which was pretty tasty. I would REALLY recommend testing a whole wheat carrot cake. Somehow the carrot/spice combination totally hid the whole wheat flavor and it didn’t seem heavy at all!

Thursday, March 25, 2010

Mormon Messages: Becoming Provident Providers

Friday, March 12, 2010

Taste Tested - February

Breakfast - Baked Egg Roll

To download recipe card click here.

Taste: 3.5
Ease to Make: 4.0
Special Ingredients: Powdered Eggs
How Long to Make: About 30 minutes – to long!

Reviews:

Apparently I'm a pretty bad cook because my egg roll was a disaster. Even though I sprayed the pan it stuck really badly. It wasn't cooked all the way through so that, along with the sticking created a big lump of mush! I nuked it in the microwave for a minute or so and it tasted OK when smothered in ketchup!

This was very easy to make and not bad tasting. My family was not really impressed, but the ease and okay taste would make it so that in an emergency I would probably serve it again. It is very mild in flavor and maybe adding something like bacon or peppers would jazz it up a bit. Overall, it was good, but not something I would have all the time. BTW, it would not fill up a large family. There were only 4 of us eating dinner this night and we ate the whole thing without too much problem. Probably would have had to make more to fill them up.

My family gives it a thumbs up! The only problem is getting it out of the pan, it sticks a little bit so use a nice long spatula to loosen the bottom. It looks far fancier than it is to make, so you win presentation points. We have made this before, so I was already familiar with it.

Dinner - Sour Cream Chili Bake

To download recipe card click here.

Taste: 4.5
Ease to Make: 4.5
Special Ingredients: Dried onions
How Long to Make: 10-15 minutes prep, 30 minutes cooking time

Reviews:

My kids really loved it! I made another double batch tonight and we will have it again for dinner tomorrow with no leftovers!

We thought this was a lot of work for a Frito pie...could of opened a can of chili and poured it on some Fritos and would of got the same flavor, taste and texture out of it. So that was disappointing. We thought this recipe was good for a fun family night but didn't know what it had to do with food storage...I don't know how much Fritos or sour cream and other items we will be putting in our home food storage. So we were not excited about this recipe.

I had my 12 year old son make the recipe and he thought it was easy and yummy. I even had him do a double batch, so we could freeze one for later. We’re definitely adding this one to our easy dinner list!

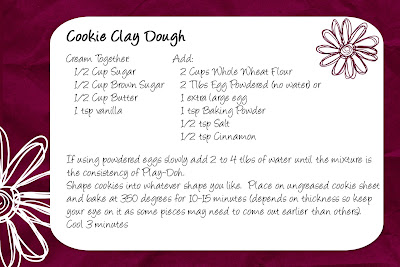
Desert - Cookie Clay Dough


To download recipe card click here.

Taste: 4.0
Ease to Make: 4.5
Special Ingredients: Wheat, Powdered Eggs
How Long to Make: 10 minutes prep, lots of time to play, 10-15 minutes cooking time

Reviews:

I played with the amount of flour and water to make the desired consistency. I did leave a pile of flour on the counter, and taught the boys when they could add the flour to avoid the sticky mess on their hands. It was a pretty messy activity, which works well for our high mess tolerance family.

The dough wasn't complicated, but we had trouble rolling it into logs on the first batch. If the dough cracks, just add a tiny bit more water (even when you use a regular egg). My youngest didn't like the texture of the dough as it leaves a grit on your hands. However, both boys enjoyed playing with it. Biggest problem was determining when they were baked. Suggest keeping them all the same size and removing the cookies from pan before they cool completely. Once baked, I couldn't stop my family from devouring the entire pan! My family gives it a thumbs up.

Wednesday, February 24, 2010

Emergency Preparedness Binder

For our February enrichment activity we put together Preparedness Binders.  These binders allow you to gather together all of your personal information in one place so it can be grabbed in an emergency or to help someone take care of things if you aren't able to. 

If you would like to put together a binder please click on the links below to download the documents:

To download the cover pages and table of contents click here.
To download a PDF version of the documents click here.
To download a Word doc version of the documents that you can filled out electronically click here.

These binders contain a lot of personal information and important documentation so make sure you keep it in a safe and secure place such as a fire proof safe or safety deposit box.  You may also want to make copies to keep with your 72 hour kits, to give to a family member or to a trusted professional advisor such as an attorney or financial planner.

Tuesday, February 23, 2010

Taste Tested - January

At the Taster Table activity we had in January we sampled a couple of Food Storage Recipes.  Below are the recipes and a review of each of them:

Blender Wheat Pancakes

To download recipe card click here.

These pancakes were super easy to make and a huge hit.  When I tried them at home I used the hard red wheat from the the church.  They didn't turn out great (in fact my husband stated that he only eat them in an emergency!) so I bought some white wheat from Whole Foods (2 cups for less than $1) and they turned out much better.  Of course, that could also be due to the fact that I forgot to add the baking powder the first time round!!

Apple Sauce Muffins

To download recipe card click here.

These muffins were pretty simple to make and had a really nice apple spice flavor to them.  The centers didn't cook so well so make sure you check that they're done before you take them out of the oven.  They were a hit, the sisters loved them and the kids in the nursery couldn't get enough of them.

Beef Stroganoff

To download recipe card click here.

The Beef Stroganoff was really tasty.  One tip would be to add some onions, either fresh or dry, and you can also substitute the Worcestershire sauce for soy sauce if you like.

Lemonade Cream Pie

To download recipe card click here.

I love lemon flavored things so I thought this recipe was great, although the punch powder made it a little gritty.  Rebecca Rasmussen (who made the pie) was not as keen though.  That being said it all got eaten so I would still give it a thumbs up. 
The amounts given for the pie crust actually made two pie crusts!  Rebecca also added more water to the crust.  There are no instructions listed for how to bake the pie crust so Rebecca did the following:

Cover the uncooked pie crust with aluminum foil.
Bake with foil at 450 degree for 5 minutes.
Remove foil and cook for 6 more minutes until golden. Adjust cooking time as needed.

Emergency Essentials Order